Every spring, when the squirrels start foraging for nuts and bears awake from their long hungry slumber, livecoders from around the world crawl out of their sleepy dens to participate in a global series of online concerts. They call this livestreaming festival Eulerroom Equinox (yes, that’s a pun on the ubiquitous ‘Boiler Room’ series of online concerts).
Eulerroom is a collection of livestreamed Algoraves (livecoding concerts, often with rudimentary forms of dancing), some proper concerts in their own right. Last year, we had a bang-up one at Goldsmiths in London where I debuted my livecoded 3D printing performance. This year, because we’re in the midst of a global pandemic and can’t meet in public, we cancelled the live event and tried to figure out how to mix and stream about 8 remote acts. (They also cancelled my livecoding workshop at the Design Museum, which is a shame!)
Usually, we used OBS Studio, a very nice and free open source software program for capturing and streaming video to pretty much anywhere. We mixed together all the performances through our audio desk, put a camera or two on the live screens, and used OBS to broadcast straight to YouTube using Eulerroom’s streaming settings.
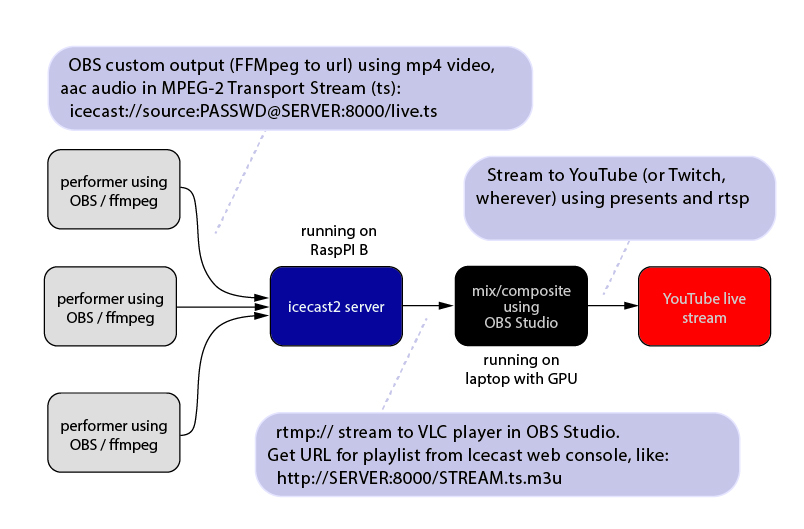
This year, we could all either take turns streaming, or stream to one central computer run by the organiser (me) which would keep time, tell people their cues, mix all the audio & video streams (and live composite some of them) and re-broadcast them to the live YouTube stream. The final setup looked a bit like this:

Installing the Icecast streaming server
Enter Icecast (technically Icecast2), an Open Source, free streaming server from the late ’90s. I set up a spare Raspberry PI B that I had laying around and installed icecast2 on it starting with the instructions from here (except for Darkice which I didn’t need): https://maker.pro/raspberry-pi/projects/how-to-build-an-internet-radio-station-with-raspberry-pi-darkice-and-icecast Basically, this boils down to opening the Terminal and running:
sudo apt-get install icecast2Then there’s some configuration to be done. Instead of using the localhost hostname, I decided to make this visible to the outside world using the port forwarding capabilities of my cable modem. I simply went to https://www.displaymyhostname.com/ (I’m sure there are plenty more and I could have done this using dig or another tool but… meh) and I got my fully-qualified hostname. Of course, that’s for my cable modem. So I still needed to send public traffic from my cable modem to my internal network’s RaspPI to make this work.
Forwarding public Internet traffic
First, getting public Internet traffic to my PI: I opened up the modem’s web configuration (you should have docs on this that came with your modem) and set port forwarding to send all incoming data from ports 8000-8079 to my Raspberry Pi. It was surprisingly easy! Just make sure to choose port 8000 for the icecast2 installation, just like I did, or you’re on your own here.
Ports and maximum connections
Getting back to the icecast2 installation — I used this public hostname instead of the one from the setup instructions above. I also used port 8000. Later, when asked for passwords, I used a password generator’s strong password (10-16 characters) because this will be a public service and you don’t want to get hacked!
When finished with the graphical icecast2 installer, you’ll need to do one quick edit to the config file to let multiple people stream to your server. In your favourite text editor open up (with root privileges):
/etc/icecast2/icecast.xmlOn around line 15 you’ll see a block starting with <limits>. Look for the one below that says <sources>1</sources> and change the 1 to something like 20, meaning 20 different streams can be coming in to your server at any time. Save the file and exit.
Now in the terminal again, start icecast2 by running: sudo service icecast2 start
You should be ready to take connections!
Sources: Setting up icecast output in OBS
You’ll need a video source to send something to your server. Install OBS if you haven’t already, or make sure it’s upgraded to version 24 or above (25 is the highest at the time of this writing). Open it and click the ‘Settings’ button in the bottom right, then click ‘Output’ (not Streaming!) on the left menu and the ‘Recording’ tab as in the picture. Then, enter the settings as in the picture below:
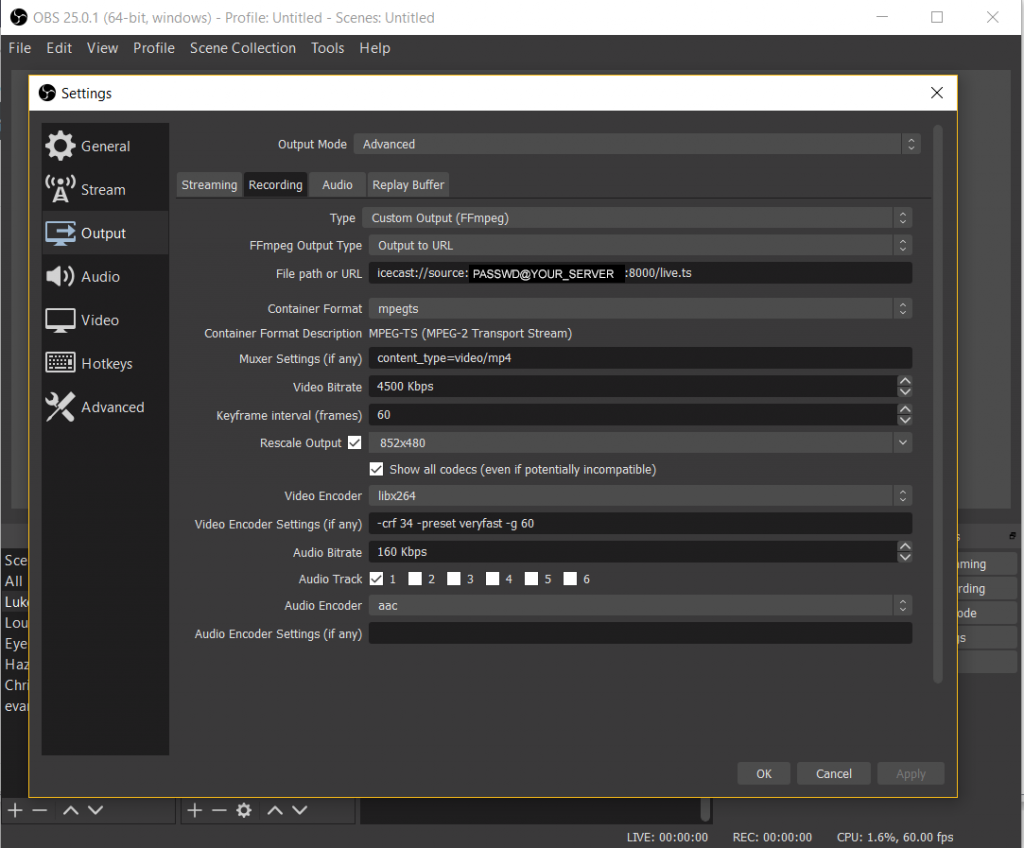
- icecast url:
icecast://source:PASSWORD@SERVER_NAME:8000/live.ts - muxer settings:
content_type=video/mp4 - video encoder settings:
-crf 34 -preset veryfast -g 60
…where PASSWORD is the stream password you chose when you set up icecast2 (if you forgot, it’s in that icecast.xml file we edited before) and SERVER_NAME is the hostname from the setup as well.
Now you’re ready to stream! This is also the setup for any performers connecting to your stream, to be mixed and re-broadcast. You can test it by adding a source in OBS (try capturing a window, or using a static image) and then clicking Start Recording (again, not Start Streaming).
Previewing streams in VLC
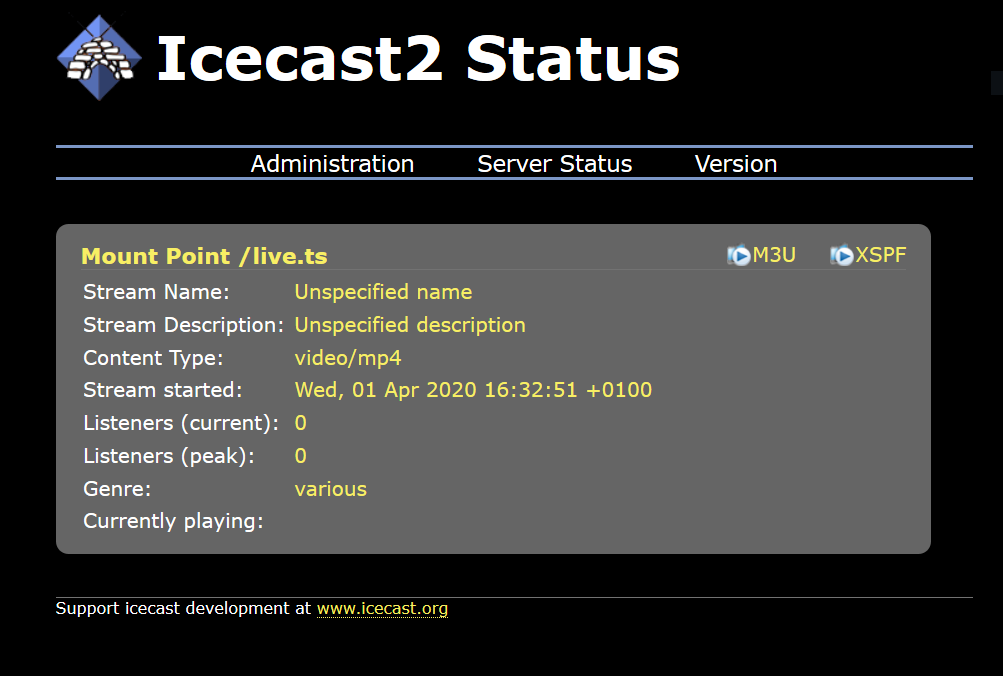
Icecast has a nice web interface that lets you see all streams, so open a web browser on another computer (or any computer, really) and type in the hostname from above with port 8000, something like http://YOUR_SERVER:8000 and hit enter. You should see the web interface screen. Click the ‘Server Status’ tab and you’ll see a list of all streams connected, along with handy links to them that you can right-click on (the M3U icon), copy the url and then open in VLC (my preferred free streaming video player).
- In VLC, go to Media ? Open Network Stream
- Make sure the Network tab is highlighted and in the the network URL box paste the stream URL you copied from the icecast2 web page. It should look like
http://YOUR_SERVER:8000/live.ts
Getting streams into OBS
Now comes the easy part. OBS has VLC built right into it, so you can create a VLC source and paste in your stream URL just as you did into VLC!
Click the + sign under Sources and choose New VLC Video Source. Where it says playlist again click the + and choose Add Path/URL and paste the URL you copied from your Icecast server admin page (same one you put into VLC) into the text box and hit ok. It might take a few seconds to load, but you should now see you video (and audio) coming from the Icecast server!
Now you can mix broadcasts, composite them, create scenes with different broadcast groups and apply effects. to stream to YouTube or wherever, click Settings and put in the correct streaming settings as per your service’s instructions. Then hit Start Streaming to make them live!
Good luck and let me know how you get on. I’m at @evanraskob on Twitter.